|
|
9 years ago | |
|---|---|---|
| esp_iot_sdk_v1.5.2 | 9 years ago | |
| html_orig | 9 years ago | |
| include | 9 years ago | |
| libesphttpd@13fa224963 | 9 years ago | |
| user | 9 years ago | |
| .gitignore | 9 years ago | |
| .gitmodules | 10 years ago | |
| CMakeLists.txt | 9 years ago | |
| LICENSE.txt | 9 years ago | |
| Makefile | 9 years ago | |
| Makefile.combined | 11 years ago | |
| Makefile.ota | 10 years ago | |
| Makefile.separate | 11 years ago | |
| README.md | 9 years ago | |
| build_demo.sh | 9 years ago | |
| build_parser.sh | 10 years ago | |
| build_web.sh | 9 years ago | |
| demo_deploy.sh | 9 years ago | |
| esphttpdconfig.mk | 9 years ago | |
README.md
ESPTerm
ESPTerm is a VT100-like terminal emulator running on the ESP8266 WiFi chip.
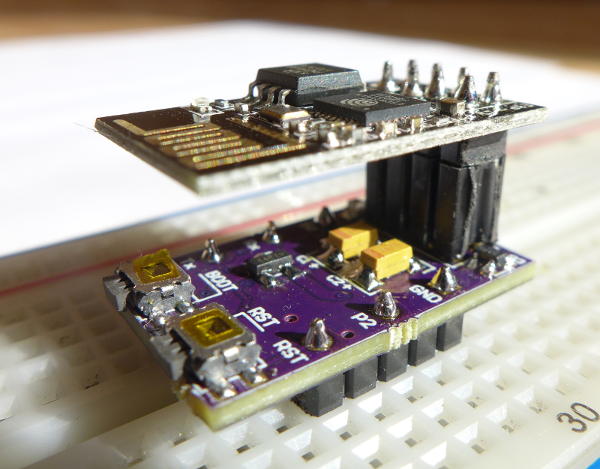
Fig 1: Breadboard adapter developed for ESPTerm
Version 1.0.0 passes most of VTTEST test cases (from the main menu and some Xterm specific), making it functionally comparable to eg. gnome-terminal, terminator, konsole, GtkTerm or PuTTY. ESPTerm is capable of running Midnight Commander through agetty, including full mouse support, provided agetty is made to believe it's Xterm, which shows ESPTerm is sufficiently well implemented to work with ncurses.
To see what escape sequences are supported, check out this annotated Xterm manual page which was used for reference, or the built-in help page (online demo)
The terminal screen can be accessed using any web browser, even on a phone or tablet. It works with ESP-01, ESP-01S, ESP-12 and likely many other modules (I use an ESP-12 on a LoLin NodeMCU board from eBay for development).
With ESPTerm, you can add remote access via WiFi to any embeded project, all you need is a serial port and some imagination!
Try it online
You can try the web user interface here: espterm.github.io
The demo is almost identical to the real thing, except, of course, it doesn't do much without the emulator backend that runs on the ESP8266. The web version will be updated to match this repository after each minor release.
Main features
- Almost complete VT102 emulation with some extras from Xterm, eg.
- Screen size up to 80x25
- All standard text styles and 16 colors supported
- Full UTF-8 support, alternate character sets
- Standard mouse tracking modes
- You can dynamically set screen title, button labels...
- Web Interface
- Real-time screen update via WebSocket
- Button to open keyboard on Android
- 5 buttons under the screen for quick commands
- Text file upload tool with configurable delays and line endings
- Built-in help page (demo) with basic troubleshooting and command reference
- Robust WiFi configuration interface (Demo: WiFi, network config)
- Static IP, DHCP, channel selection, power
- SSID search utility for finding your existing network
Running ESPTerm
To run ESPTerm on your ESP8266, either build it yourself from source using xtensa-lx106-elf-gcc
(and the included Makefile), or download pre-built binaries from the GitHub releases section.
Flash the binaries using esptool.
Pins
- Pin GPIO2 is used for debug messages at 115200 baud, 8 bit, no parity.
- Pins Rx and Tx are used for the main communication UART, parameters of which can be set on the system config page. Connect your USB-serial dongle or application microcontroller here.
Setup
- When flashed for the first time, ESPTerm wipes any possible previous WiFi configuration, because it implements its own WiFi config manager with many additional features.
- It should start in AP mode, the default SSID being
TERM-MACADRwithMACADRbeing three unique bytes from the MAC address / Device ID as ASCII hex. - Connect to the AP via a smartphone or laptop and configure WiFi as desired. If a captive portal page does not open, try 192.168.4.1 in your web browser.
Rescue from messed up config
It can happen that some changes to the WiFi or network config make the module inaccessible.
- To re-enable the built-in AP, hold the BOOT (GPIO0 -> GND) button for about 1 s, until the blue LED starts flashing. Then quickly release the button.
- To reset all settings to defaults, hold the button a couple seconds until the LED flashes rapidly, then release it.
- You can cancel this wipe/reset operation (when triggered by accident) by pressing Reset or disconnecting the power supply.
Config files
ESPTerm has two config "files", one for defaults and one for the currently used settings. In the case of the terminal config, there is also a third, temporary file for changes done via ESC commands.
When you get your settings just right, you can store them as defaults, which can then be at any time restored
by holding the BOOT (GPIO0) button. You can do this on the System Settings page. This asks for an "admin password",
which you can define when building the firmware in the esphttpdconfig.mk file.
The default password is 19738426. This password can't presently be changed without re-flashing the firmware.
You can also restore everything (except the saved defaults) to "factory defaults", there is a button for this on the System Settings page. Those are the initial values in the config files.
Research resources
Developing ESPTerm wasn't an easy task, because the information is scattered across many places and the existing terminal emulators I originally used for reference (terminator, Konsole) are not implemented correctly in some details.
A great tool for checking my implementation has proven to be VTTTEST and Xterm as a reference implementation that is probably the most complete emulator available, although it's cumbersome to use and its age really shows in the looks.
I've comnpiled a list of those I found most helpful here: VT100 emulation resources
Development
ESPTerm's firmware is written in C and is based on SpriteTM's libesphttpd http server library forked to
MightyPork/libesphttpd. This fork includes various improvements
and changes required by the project.
Installation for development
- Clone this project with
--recursive, or afterwards rungit submodule initandgit submodule update. - Install esp-open-sdk and build it with
make toolchain esptool libhal STANDALONE=n. Make sure thextensa-lx106-elf/binfolder is on $PATH. - Install esptool (it's in the Arch community repo and on AUR, too)
- Set up udev rules so you have access to ttyUSB0 without root, eg:
KERNEL=="tty[A-Z]*[0-9]*", GROUP="uucp", MODE="0666" - Install Ragel if you wish to make modifications to the ANSI sequence parser.
If not, comment out its call in
build_parser.sh. The.rlfile is the actual source, the.cis generated. - Install Ruby and then the
sasspackage withgem install sass(or try some other implementation, such assassc) - Make sure your
esphttpdconfig.mkis set up properly - link to the SDK etc.
The IoT SDK is now included in the project due to problems with obtaining the correct version and patching it. It works with version 1.5.2, any newer seems to be incompatible. If you get it working with a newer SDK, a PR is more than welcome!
Web resources
The web resources are in html_orig. To prepare for a build, run build_web.sh, which packs them and
copies over to html. The compression and minification is handled by scripts in libesphttpd, specifically,
it runs yuicompressor on js and css and gzip or heatshrink on the other files. The html folder is
then embedded in the firmware image.
It's kind of tricky to develop the web resources locally; you might want to try the "split image"
Makefile option, then you can flash just the html portion with make htmlflash. I haven't tried this.
For local development, use the server.sh script in html_orig. It's possible to talk to API of a running
ESP8266 from here, if you configure _env.php with its IP.
Flashing
The Makefile should automatically build the parser and web resources for you when you run make.
Sometimes it does not, particularly with make -B. Try just plain make. You can always run those
build scripts manually, too.
To flash, just run make flash.